Previous Tutorial
Main Menu
Next Tutorial
Generating Symbol View
Now the inv cell has layout, extracted, and abstract views. As a lowest
level library cell, it needs one other important cell views.
Symbol view:
This view is necessary for schematic design entry. It is the symbol which
represents the cell. If you perform design entry by verilog netlist, you
don't need to generate symbol view.
To generated symbol view for inv:
- Start Cadence using "icfb".
- In CIW menu, select File -> New ->
Cellview ... A create New
File form appears. Fill in your library name for Library,
"inv" for Cell, and "symbol" for View, and
select "Composer-Symbol" for Tool, then Click "OK".
This brings out a Composer-Symbol Editing window.
- In Composer menu, select Design -> Create
Cellview -> From Pin List ... This brings out a Cellview
From Pin List form.
- Type "a" as Input Pins, "y" as Output
Pins, "inv" as Cell Name. Change View Name to
"symbol". Unselect Edit Options and click "OK".
- Choose Replace if it tells you that the symbol already exists.
Comment: Pin names in symbol view must be exactly the same as pin
names in layout view or you will experience huge problems when
doing auto placement and routing.
Comment: Default power pins vdd! and gnd! should not appear
in symbol view.
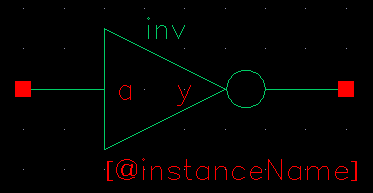
The symbol view will be generated and brought out in symbol editing window
(shown below).

Note:
To tailor made your own symbol view, you can use the built-in
commands. Open your symbol view, click Add -> Shape ->
Line You can then draw your desired symbol view. The bubble can be
drawn using the Add -> Shape -> Circle Once you're
done, you can delete unwanted lines and move the pins to desired
positions. A symbol for inverter can be like this:
 You may close symbol window after you modify your symbol view.
Refer to 'Preview Library Development Reference' and 'Composer Design Entry
reference' for more information about abstract and symbol generation.
Previous Tutorial
Main Menu
Next Tutorial


